Wednesday 29 February 2012

Eggless Wheat pancakes

Pancakes are a hit with my little girl. She loves them, I can give one to her before she leaves to school, put one in her box and give her one more when she gets back from school. No other breakfast, except maybe French Toast goes down this well with her. But folks at home always complained of the eggy smell and taste of pancakes. So I decided to try an eggless one. I googled and found one recipe consistently on most websites.

Ingredients:
1 cup all-purpose flour (I used whole wheat flour)
1 teaspoon sugar
1 teaspoon cinnamon
2 teaspoon baking powder
1 cup whole milk
1 tablespoon vegetable oil
1 tablespoon water
1 teaspoon vanilla extract
2 tablespoon butter
  
Method:
Combine the dry ingredients in a bowl and whisk together. Add milk, oil, water and vanilla. Whisk together until just combined. Be careful not to over mix - it should still be slightly lumpy. Over-mixing will result in tough pancakes. Set aside to rest for a few minutes.
Heat a large skillet over medium-high heat until hot. While pan is heating, add butter. As soon as the butter is melted, add melted butter to pancake batter.
Return pan to stove and stir butter into batter.
When pan is hot, with a measuring cup or ladle, pour 1/4 cup of batter into the skillet for each pancake.
Cook until bubbles form on the surface. Carefully flip pancakes with turner/spatula and cook until golden brown.

Serve hot with maple syrup/honey/jam.

Verdict: This was loved by folks at home. But I felt the baking powder was way too high in this recipe. We can do with just 1 tsp of baking powder.

priya's signature image at photobucket

Eggless Chocolate Cake - Anniversary special

I make plans to bake special cakes on occasions. I decide on the recipe at least a week in advance and I try to bake the cake the previous day or on that day. But I rarely get the timing right. I usually end up starting late and I rush through at the end. At other times I goof up with a particular recipe. That is exactly what I did on my anniversary day.
I had planned on making a chocolate sponge cake with whipped cream frosting. It was a weekday and I was planning to work from home that day, so that should have given me good time to bake. But that was not to be. First of all I was so busy with work that day and secondly I had friends calling up and wishing me for most part of the day.
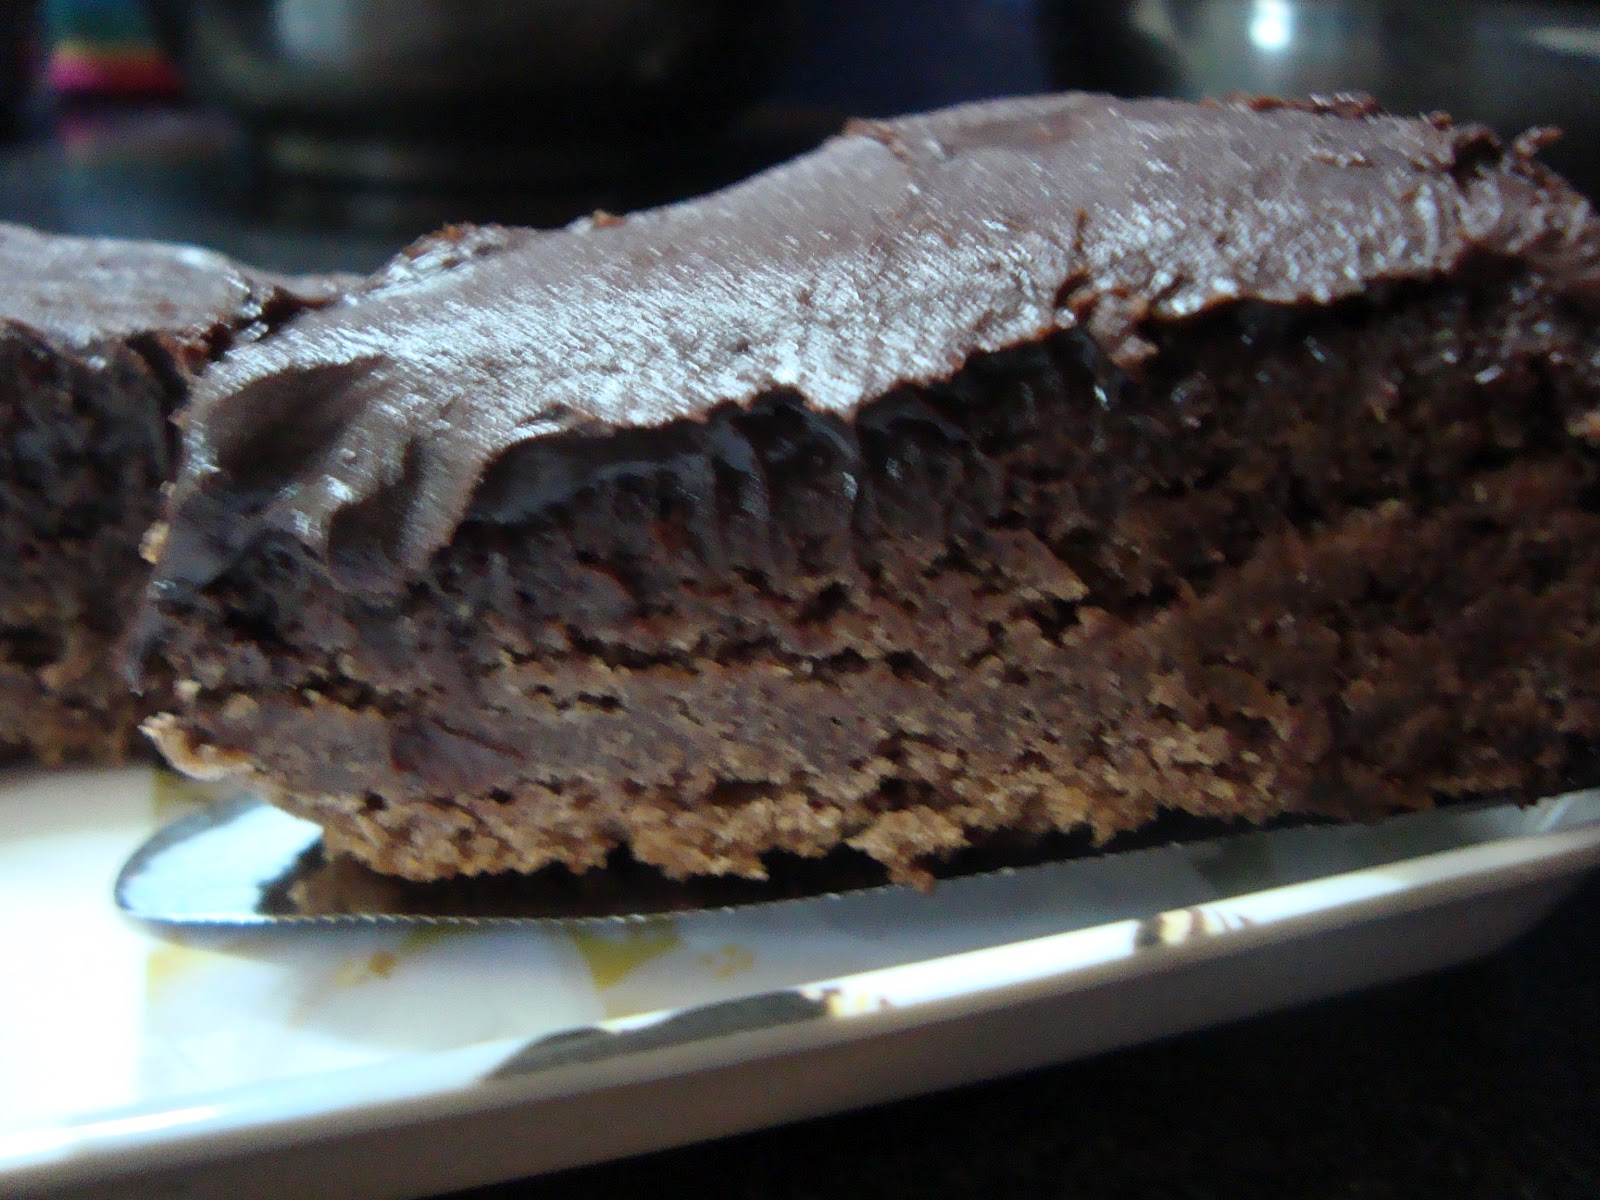
When I got to the cake it was mid day.  The sponge turned out terrible :(. So I had to switch to a quick two bowl chocolate cake with ganache frosting. By the time I baked the cake, it was so late and we were planning to go out for dinner, I made the frosting in a rush and poured it over the cake.
The taste of the cake compensated for all the goof-up :). I finally served the cake the following day! Lo and Behold! Hubby dear gobbled up one entire piece of this sinfully tasty dense cake.

Ingredients:
Maida/Flour - 1 cup
Baking powder - 1 tsp
Cocoa powder - 2 tbsp
Butter - 1/2 cup
Powdered sugar - 1 cup
Vanilla essence - 1 tsp
Hot milk - 1/2 cup
Curds - 1/2 cup
Baking soda - 1/2 tsp

Method:
Grease an 8 inch round cake pan. Line with parchment paper.
Sieve flour, baking powder and cocoa powder thrice.
In a separate bowl, beat butter and sugar till fluffy.
Add vanilla essence, curd and baking soda; Beat well.
Add 1/2 of the flour mix and 1/2 of the milk, mix slowly and repeat the same process twice till everything is mixed well.
This cake can be baked in a microwave dish too. Transfer to the dish and microwave uncovered at 60 % power for 11 minutes.
Alternately it can be baked in an oven at 150 degrees C for 45 minutes.
Cool for 10 minutes and invert into a rack or a plate.

For the frosting:
Dark chocolate chopped fine - 1 1/2 Cups
Cream - 1 1/4 Cup, I have used 25% fat, Amul
Unsalted butter - 1 tablespoon

Bring the cream and butter to a boil in a heavy saucepan, over low heat. Boil for a full minute, taking care not to burn the cream. Take off the heat. Gently stir in the chocolate and leave for 2-3 minutes, till the chocolate dissolves completely.
Chopping the chocolate fine helps it to dissolve faster. Stir gently with a spatula till it becomes a homogeneous mixture. (I goofed up here. I had chopped the chocolate coarsely, and so I had small chips of solid chocolate in the ganache).
Do not stir or whisk vigorously as it may cause the ganache to become grainy. Strain the ganache, cover the bowl with a cling film. Chill in the fridge till thick and of spreadable consistency.

You could also pour the ganache if you wish, in this case, no need to refrigerate the same.

I poured some ganache over the cooled cake. I used cling wrap and put the cake in the refrigerator. I also put remaining ganache in the refrigerator. The next day I took the cake out and brought the ganache to spreadable consistency and spread another layer on top of the cake.
Verdict: I was happy with the cake, although the ganache could have been smoother. This is one incredibly rich, dense cake with wonderful chocolate ganache! A good celebration cake... I plan to make this once more but in a leisurely manner :). Lets hope that happens.  
priya's signature image at photobucket

Tuesday 7 February 2012

Paruppu-urundai Kozhambu (Lentil Balls gravy)


There are some favourite dishes of mine. Mom alone knows what those are and she never fails to squeeze them into my kitchen from time to time. Mom are simply the best, right!
This paruppu urundai kozhambu is one of those dishes. She always proposes to make this only when we are home for lunch. She never makes it when we are away at work. Told you right, no one cares for you the way moms do :)

Ingredients:
For the gravy:
Onions, large - 2
Tomatoes, medium - 2
Ginger paste - 1 tsp
Garlic paste - 1 tsp
Chilli powder - 1 tbsp
Salt - to taste
Cumin - 1 tsp
Curry leaves - 6-7
Garam masala - 1/2 tsp
Oil -  1 tbsp
Water - 1-2 cups
Corainder leaves - for garnishing
For the paruppu urundai:
Refer to the post here for the Paruppu vadai recipe. You need to make small balls and fry these as balls instead of flattening them with the palm of the hand.

Method:

Chop the onions and tomatoes and keep aside. Heat the oil in a heavy bottomed cooking vessel. Fry the onions and curry leaves for a few minutes until the onions turn golden brown.
Add the ginger and garlic paste, chilli powder, garam masala and cumin and continue frying. Finally add the tomatoes and fry until the raw smell goes and a nice aroma emanates.
Add water and bring to a boil. Boil the gravy for 5 minutes. When the gray is still hot, start making the paruppu urundai. Drop the fried paruppu urundai into the hot gravy.
Garnish with coriander leaves and serve hot with dosa or rice.
Verdict: Awesome is not the word for this gravy. This is a major hit at home with hubby dear too! 
priya's signature image at photobucket

Paruppu Vadai

If there is a contest between the vadai varieties and I am asked to judge, I will always vote the paruppu vadai the best! Biased, me! But I am sure even though some folks might have other preferences no-one dislikes this vadai.
This is a must have for all festive occasions at home. For the same reason it is very difficult for me to get good pictures of this vadai.

Ingredients:
Channa dal (bengal gram) - 3/4 cup
Toor dal/Masoor dal - 1/4 cup
Onions, large - 2
Green chillies - 2
Curry leaves - 10-12
Coriander leaves - 2 tbsp
Cumin powder - 1 tsp
Asafoetida - 1 pinch
Salt - to taste
Oil - for frying
Water - for blending the mix

Method:
Wash and soak the both the dals together for an hour.
Chop the onions, chillies, curry leaves and coriander leaves.
Drain the water from the soaked dal and grind the dal to a very coarse mix. It is good to have some whole dal grains.
Mix in the chopped onions-chillies mix from above and add the cumin, asafoetida and salt.

Heat oil in a pan. Make small balls of the vadai dough, flatten a little with the palm of the hand and fry until golden brown.
Serve hot with chutney or tomato sauce.

Tips: You could use red chillies instead of green chillies.
Do not let the dal soak for more than 1.5 hours. The longer the dal soaks the less crispier the vadai turns out.
For the same reason it is not a good idea to make the vadai dough in advance.

Verdict: This is always a hit at home. Dear hubby gobbles up two of these even before it goes for pooja. But I do not really mind these things, and mom is also very happy that he eats, let alone worry that it was not offered to God first!
priya's signature image at photobucket

Raagi Rotti

Children grow up so fast! The infant in your arms who only wanted a few ounces of milk every now and then, suddenly starts taking thin porridge followed by lumpy thick porridge and finally rice and idli. By this time they are sitting on a chair and eating their meals from a bowl and spoon, with your help ofcourse. Then the much loved porridge becomes a horrible choice for a meal for them. They hate that bowl and spoon. They see your plate on the table, a large circular plate with atleast 5 varieties of such colourful dishes. And at that instant they hate you, as you are being very unfair to them...
It is a matter of time before they start demanding the same plate and the same items that you eat. Their porridge makes them feel so little in stature and they remind you "Hey I am a grown-up now! Treat me like one!". You were least expecting it. You have about 3Kg of porridge powder left. So either the entire family starts taking porridge for meals to convince the little one or we use that porridge powder for something else. We did the latter.

We had about 3-4 Kgs of Raagi porridge powder, when we realized that our little girl is suddenly a grown up. So we decided to make Raagi Rotti with that powder.

Ingredients:
Raagi Porridge powder - 1 to 1 1/2cup (Recipe here)
Onions, medium - 3-4
Green Chillies - 3
Coriander leaves - 1/4 bunch
Curry leaves - 8-10
Salt - to taste
Oil - for making rotti
Method:
I use the shredder to coarsely chop the onions, chillies, coriander leaves, curry leaves and salt.
Add the Raagi powder to this mix and knead into a soft dough.
Take a handful of the dough and form a ball. Use oil to grease your hands.
On a greased piece of plastic paper, flatten this dough into a roti, approximately 4-5 inches in diameter.
Heat tawa and invert the roti onto the hot tawa.
Bake the roti until brown on both sides.
Serve hot with Chutney. We usually eat it plain with no sides.
Verdict: Simple and easy preparation and wholesome food. Makes an excellent breakfast/dinner item. Also makes a great lunch box item.
priya's signature image at photobucket

Cabbage Rice


Not many folks are fond of cabbage at home. They feel it has a pungent odour, pungent taste and does not have much value. But I beg to differ. Cabbage is a wonderful vegetable. It is a rich source of Vitamins C and B2 (riboflavin). It can be used in diet programs for a low calorie diet. And it can be made very tasty!

Ingredients:
Cabbage, small - 1 (typically 2 cups of shredded cabbage)
Rice - 1 cup (150 ml rice measuring cup)
Onions, medium - 1
Green chillies, slit - 2-3
Garam masala - 1/2 tsp
Coriander leaves - 1 bunch
Cashews - 6-7
Ginger - 1 tsp
Salt - to taste
Bengal gram - 1 tsp
Urid dal - 1 tsp
Mustard - 1/2 tsp
Curry leaves, chopped coarsely - 6-8
Oil - 1 tbsp
Ghee - 1 tbsp - for garnishing
Coriander leaves - for garnishing 

Method:
Clean and shred the cabbage and keep aside.
Cut the onions and slice the green chillies. Keep aside.
Clean the coriander bunch.
Soak the cashews in hot water for 10 minutes.
Grind the coriander leaves, cashwe, ginger and salt into a thick paste using very little water.
Cook the rice separately and allow it to cool down. Add a tsp of oil to rice, to keep the rice grains separate, and avoid clumping as the rice cools down.
Heat oil in a heavy bottomed vessel. Add mustard, urad dal and bengal gram.
When the dal turns golden brown and the mustard starts to splutter, add the onions, chillies and garam masala. Fry for a few minutes.
Add the shredded cabbage and fry until the cabbage feels soft and cooked.
At this stage add the ground coriander paste.
Keep frying until a nice aroma comes.
Finally add the cooked rice and gently mix until the cabbage mix and the rice are well combined. 
Verdict: For those who do not like cabbage, this rice is a pleasant surprise. It is very tasty with none of the pungent taste or odour of the cabbage. My mom avoids cooking cabbage until the last possible day, when there are either no other vegetables left or when the cabbage will go bad if left in the refrigerator. But to prepare this rice, she is more than willing to pick up the cabbage from the fridge :)
priya's signature image at photobucket


Vegetable Kurma


Mixed vegetable gravy dishes are the easiest to put together. The only time consuming part is the vegetable chopping process. Here goes on more to the long list of vegetable gravies we make at home ;)

Ingredients:
Potatoes, diced - 1/2 cup
Carrots, diced - 1/2 cup
Beans, sliced - 1/2 cup
Green peas - 1/2 cup
Onions, medium - 2
Tomato - 1
Ginger paste - 1 tsp
Garlic paste - 1 tsp
Green chillies, sliced - 2
Garam Masala - 1/2 tsp
Salt -  to taste
Oil - 1 tbsp
Coconut milk - 1/2 cup (you could use 2 tbsp of dessicated coconut, ground into a fine paste)
Coriander leaves - for garnishing.

Method:
Heat oil in a heavy bottomed vessel.
Add the onions, green chillies and saute for a few minutes.
Add the tomatoes and fry for a couple of more minutes.
Add the masala pastes and powder and continue frying.
Finally when the raw masala smell is gone, add the vegetables and fry for a few minutes.
Add very little water and cook the vegetables until soft.
When the vegetables are cooked, add the coconut milk and heat for a couple of minutes.
Garnish with coriander leaves and serve hot with Rotis or Puris.
Verdict: What is not to like about vegetables with a dash of coconut milk. This recipe yields a mildly spicy kurma. You can increase the green chillies if you prefer it spicier.


priya's signature image at photobucket